
Stop motion is the darling video format of the social media age. It’s fun, light-hearted, engaging, and appropriate for many types of videos. So, how can you go about making your own stop motion animation? Since stop motion animation requires a certain level of precision and attention to detail, there are many pitfalls to be aware of. From the lighting to the plan of action, these six key factors can impact your final result. Here’s our guide to getting it right. What is Stop Motion Animation?Stop motion animation is a specific type of animated video where the action taking place is filmed one frame at a time. Typically, it’s done with inanimate objects to bring them to life in unexpected ways. A particularly famous subcategory of stop motion is claymation. A hugely popular series called Wallace and Gromit was made entirely from claymation, with each video taking a tremendous amount of work hours to produce. Recently, at SproutVideo HQ, we got into the Halloween spirit with a stop motion animation of our own. Check it out: Stop motion can be used for all types of video, from feature-length films to ads on social media. It’s flexible, since nearly any object can be animated one frame at a time, but also comes with lots of creative constraints. Here are the six steps you need to take to get it right. 1. Precise PlanningStop motion video is one of those projects that sounds a lot simpler than it is. Moving and filming an item a frame at a time should be straightforward enough, right? Turns out, there’s a lot more to it than that. Stop motion animation requires a lot of planning to turn out well because the process is almost completely linear. Unlike with other types of video, you can’t do multiple takes to see if one turns out better than the other. If anything changes during the course of filming, you can’t quickly reset and pick up where you left off. It’s very difficult to add anything in or take something away on the fly. You typically have to start over to make even simple corrections. Sketch or storyboard what you want your action to be. Have a very clear concept and script before you start rolling, since there’s no backtracking once you start moving elements around on camera. 2. Control the LightingMake sure to use studio lighting if possible. By studio lighting, we mean a controlled environment where you can set and adjust the lighting very precisely. Usually, you use different types of artificial light sources directed at your subject to get the effect you want, and block out natural light sources. 
Otherwise, imperceptible changes in natural light will make your stop motion flicker during playback. Even a small difference in shadows or brightness can really stand out with this type of animation. Our guide to tabletop shooting is a can’t-miss if you’re planning a stop motion animation video. It’ll walk you through exactly how to set up your lighting for this type of project. 3. Lock Down Your CameraMake sure to use a sturdy tripod, and DON’T BUMP IT. This is harder than you might think, since stop motion shoots tend to be lengthy, and usually require a lot of walking around, moving props, eating take-out, etc. No matter how much action and chaos might be going on in the studio, be careful around your camera. Use road cones, gaffer tape, or other obstacles if need be. If you bump the camera, you may have to start from scratch. A small change in your camera angle can throw off everything. From the lighting to the perspective on your subject, it’s very important to keep it consistent for a polished end result. 4. Lock Down Your SubjectsConsistent lighting and a stationary camera are key to filming smooth and appealing stop motion animation. Similarly, for your subject, any movement has to be very intentional. Make sure to change only one element at a time, and take the time to figure out how to lock down the items on screen that aren’t supposed to move. The smallest nudge to an object that wasn’t meant to budge can be really obvious and distracting. If your subject is a pile of small slips of paper, for instance, a sneeze is all it takes to ruin your shoot. For example, for our pumpkin video, we drilled holes into our tabletop and bolted the pumpkin to it to keep it from wiggling around while our artist carved it. This is a bit extreme, but it was necessary for a large, relatively heavy object like a pumpkin. We also used brightly colored tape to mark the positioning of our second pumpkin. 
For smaller scale shoots, you can use double-sided tape, velcro, or other crafty solutions to prevent unwanted movement. Of course, sometimes, a small amount of movement in background objects can be desirable in animations. For instance, when we animated watercolor sketches for our Earth Day celebration video, we wanted the elements to move around a little to appear more lifelike and natural. Here’s an excerpt as an example: With stop motion animation, a little extra wiggle can add energy and excitement to what’s happening on screen. However, you still need to introduce it with intention, otherwise it can be overwhelming and distracting from the main action. 5. Make Small MovementsStop motion animation rarely looks as smooth as live action shots. That’s part of its appeal and one of its defining characteristics. However, there is a difference between jumpy and stuttering animation, and a more professional result. The trick is not to move too much at once. This requires a level of patience and attention to detail that other types of filming simply do not. Making small, incremental movements will result in smoother animation. Of course, there is a limit to what’s feasible in a given timeframe, or simply to preserve sanity. Before shooting, perform some simple tests by moving an object across the screen in different measures to figure out what looks right for your project. 6. Shoot More Than You Think You NeedShoot a frame at every small change, and add more frames than you think you may need. If your playback is too slow, you can always speed it up in your editing software, or remove frames. However, you can’t create frames that aren’t there after your shoot is completed. 
Here are your options for capturing your stop motion animation on camera. Still Photo CamerasMost stop motion animations aren’t actually filmed – they’re photographed. The approach is simple. Use a still photo camera, and snap a photo after each movement. Each photo represents a frame of your video. During the editing process, you can duplicate frames as needed for your animation. The main advantage to using a photo camera is that you have more lighting options. Strobes or constant lighting both work with this approach. Another good tip is to use a shutter remote or bluetooth app to control the camera so you don’t accidentally bump it while pressing the shutter button. Video CamerasIf you’re using a video camera, all you need to do is record a second or two for each frame. This is similar to using a photo camera, but will likely result in more frames than you really need, and requires the use of constant lighting. Alternatively, you could record the entire process without stopping and starting the camera for each frame. This reduces the amount of contact with the camera, which can help ensure it stays stable throughout. Also, it gives you more options since you could create a high-speed time lapse of the entire shoot in addition to your stop motion animation. However, you’ll have to edit out a lot of frames to create your stop motion animation. Also, you’ll use quite a bit more storage space with this approach. For our pumpkin shoot, we had to use a video camera because of the transition from stop motion to rolling video at the surprise reveal. Otherwise, we would’ve used a photo camera. No matter what, we wanted a high-speed time lapse of the process, so we recorded that part separately with a GoPro. If you have a stop motion animation video ready to share with the world, you can get started with a 30 day free trial today! Questions about making your own stop motion video? Get expert advice in the comments below. from SproutVideo https://sproutvideo.com/blog/stop-motion-animation-secrets.html via IFTTT from https://johnsmith0190.tumblr.com/post/188544077043 from https://alvindukes.blogspot.com/2019/10/the-six-secrets-to-stop-motion-animation.html
0 Comments
Coming up with ideas for video marketing campaigns can be difficult. It can take a lot of trial and error to find out what resonates best with your audience. What if we told you there was a way to get your customers to tell you exactly what type of videos they wanted to see? Luckily, this isn’t as difficult as it sounds. Through social listening, you can get great insights into how to improve your video marketing strategy. In this blog, we’ll cover the differences between social media monitoring and social listening, and how you can use the latter to strengthen your video marketing strategy. Social Media Monitoring vs Social ListeningSocial media is the perfect way to communicate with your customers. Equally important, it lets your customers communicate with you. This is where social media monitoring usually comes into play. Social media monitoring is the process of tracking and responding to what is being said about or directly to your brand. Typically, you’d want to track when customers mention your company, speak directly to your company, or even keywords and phrases surrounding your company, industry, and competitors. The goal of social media monitoring is simple. You’ll know exactly when you have been mentioned, and can respond quickly with a simple message to acknowledge that customer, keeping them happy and engaged. The types of interactions range quite a bit, but are narrowly focused on your company, brand, and products. For instance, sometimes you might be communicating with dissatisfied customers, answering questions about your services, or responding to praise. Social ListeningSocial listening is just as it sounds: listening to conversations relevant to your brand and industry. The scope is much larger than the narrow back-and-forth exchanges typical of social media monitoring. Awario, a company that provides tools for social listening, says it best here:
Basically, social media monitoring is performed as a micro activity, where you respond to individuals directly, while social listening is a macro activity. It’s more akin to trend analysis than anything else. For example, comprehensive social listening incorporates direct brand or product mentions, as well as your industry, competitors, and topics your target audience engages with. It also includes the sentiments, language, and cultural cues embedded in the tweets and posts your audience shares online. How to Monitor and ListenYou can easily monitor your social media the old-fashioned way by going to each platform, checking your mentions, and searching for any specific keywords relevant to your brand. However, a monitoring tool can greatly simplify the process. These tools put all your mentions and tracked keywords in one place so you or your team can respond to messages more efficiently. This will save time and reduce the chance of missing a mention. You can use HubSpot, SproutSocial, Awario, Hootsuite, or one of the many dedicated social monitoring platforms. Most of these tools double as social listening tools as well. Requirements for Social ListeningSocial listening isn’t the same as monitoring. You’re not just looking for mentions of your trademark, after all. Still, as explained above, you might be able to use the same tools. Research keywords, hashtags, topics, and influencers relevant to your brand. In addition to tracking your direct interactions online, you’re looking to compile data on the conversations taking place in these broader areas online. For example, you might notice that as the holiday season kicks into gear, more of your followers are sharing content related to baking, travel, and family gatherings. Meanwhile, their general sentiment might shift from feeling relaxed over the summer, to a little more stressed as daily life gets busier. Ideally, you’ll pick up on trends and insights much more specific to your niche. By performing this exercise on an ongoing basis, you’ll be able to dissect seasonality and understand how things change over time. Using Social Listening to Improve Your Video StrategyNow for the fun part – using all that information and analysis to improve your video marketing strategy. First, make reviewing the insights from your social listening practices an integral part of your content planning process. Instead of pulling ideas from thin air, look at the data to understand what people are sharing and engaging with online. Identify relevant takeaways for your brand, and any opportunities to add value to the conversation. Pay particular attention to the vocabulary, hashtags, emojis and other cultural cues included in what’s being shared. Finding New OpportunitiesYou should literally give the people what they’re asking for. Using the lessons learned from your social listening, ideate new video campaigns relevant to your target audience. Leveraging Positive FeedbackFor example, if you noticed lots of positive feedback after a new product launch, double down on it and create videos promoting and highlighting the aspects people most enjoy about your product or service. You’re already receiving positive feedback from a large number of people, so it’s likely this content will resonate too. Another simple idea is to check how people react to the videos you’re already creating to see what’s working. Using your audience’s reaction as a gauge of success is especially helpful when your team is experimenting with new video styles or series. For instance, you could use SproutVideo’s engagement metrics to understand whether viewers are watching, rewatching, or skipping parts of your video. That way, you’ll know if viewers are really watching your content, or if they found part of it particularly interesting. Take care to use similar language as your happy customers. When coming up with a script, describe the features and benefits in the same wording as your audience used. By framing your messaging in this manner, it’s more likely to strike a chord with new prospects. Leveraging Less Positive FeedbackFor other types of feedback, this is your chance to address it on a larger scale. You’ve already answered these customers individually while monitoring social media. Take it a step further to create videos surrounding common issues that a number of people are having. This might range from frequently asked questions, to disgruntled customers that aren’t happy with your product or service. For the former, you could create a video series to address questions that multiple people have asked. It’s easy content to create, and if some people are asking, there’s a good chance others might be thinking the same thing. For customers that weren’t happy with the product or service, we’d suggest cataloging that data. Then, when you come out with new features that might satisfy them, create a video to announce it. You may even want to go so far as to acknowledge the issues this latest release will solve. This is a great way to show unhappy customers they are being heard. Going Beyond Your Own BrandThere are many other ways to find inspiration based on the insights you garner from social listening. Look at competitors, adjacent brands, or even brands outside of your industry with appealing videos that you admire. Looking at their best-performing and worst-performing content can provide valuable takeaways for your own videos. Lastly, taking note of what your customers are saying outside of your brand can also inform some smart video decisions. Pop culture, current events, social causes, and more can all serve as a catalyst for improving and creating new content. The key is to identify the topics your audience actually cares about and engages with online. This approach will likely lead you into new content areas you previously were not addressing. You’ll reach new audiences and capture more viewer attention by factoring these trends into your video marketing strategy. For example, SproutVideo learned our audience loves to share video how-to’s, gear tutorials, and best practices for producing video content through active social listening. We developed our How To Video series to address those specific topics in our own way. That series now consistently drives strong engagement in our email marketing and on social media. It also attracts many new visitors to our blog through SEO. Being a Good Listener is its Own RewardBasically, this will help you get to know your audience better across the board. The better you know your audience, the more likely you’ll be able to make content that resonates with them. Using social listening can lead to an abundance of content that could fill your content calendar for months. All you have to do is listen to find out what the people want. We’d love to hear how you’re planning on using social listening to improve your video strategy. Let us know in the comments below. from SproutVideo https://sproutvideo.com/blog/social-listening-inform-video-marketing-strategy.html via IFTTT from https://johnsmith0190.tumblr.com/post/188415393838 from https://alvindukes.blogspot.com/2019/10/how-social-listening-can-inform-your.html While vacationing in Riviera Maya, Mexico, friends from Vancouver, British Columbia and Toronto, Ontario spent a day on a whale shark watching excursion. Whale sharks are only in this area of Cancun for a short period of a few months, from May through September so planning is key. Since the group was staying in a […] The post Giant Manta Ray swims right at side of boat appeared first on Viral Viral Videos. via Viral Viral Videos https://viralviralvideos.com/2019/10/14/giant-manta-ray-swims-right-at-side-of-boat/ The little baby loves to feed the chickens and ducks. He gives them grass and even talks to them. It’s amazing because the chicken never peck him and will run to him when he approaches! More The post Sweet baby loves to hand feed the chickens appeared first on Viral Viral Videos. via Viral Viral Videos https://viralviralvideos.com/2019/10/13/sweet-baby-loves-to-hand-feed-the-chickens/ It’s really easy to forget that we are not the only living beings living on this planet. We’re trapped in our concrete jungles, escaping the scorching heat and the freezing icy winters in the sanctity of our homes. The only contact with the outside world are photographs and videos of animals living freely in the […] The post Husky can’t contain excitement upon owner’s return home appeared first on Viral Viral Videos. via Viral Viral Videos https://viralviralvideos.com/2019/10/12/husky-cant-contain-excitement-upon-owners-return-home/ Did you know dogs dream too? They just like humans have the ability to dream while they sleep, it is very likely that they remember what they did the day before and the most important thing about their day is reflected in their dreams. When a dog rings many times we can notice it by […] The post Dreaming collie literally sings in her sleep appeared first on Viral Viral Videos. via Viral Viral Videos https://viralviralvideos.com/2019/10/11/dreaming-collie-literally-sings-in-her-sleep/
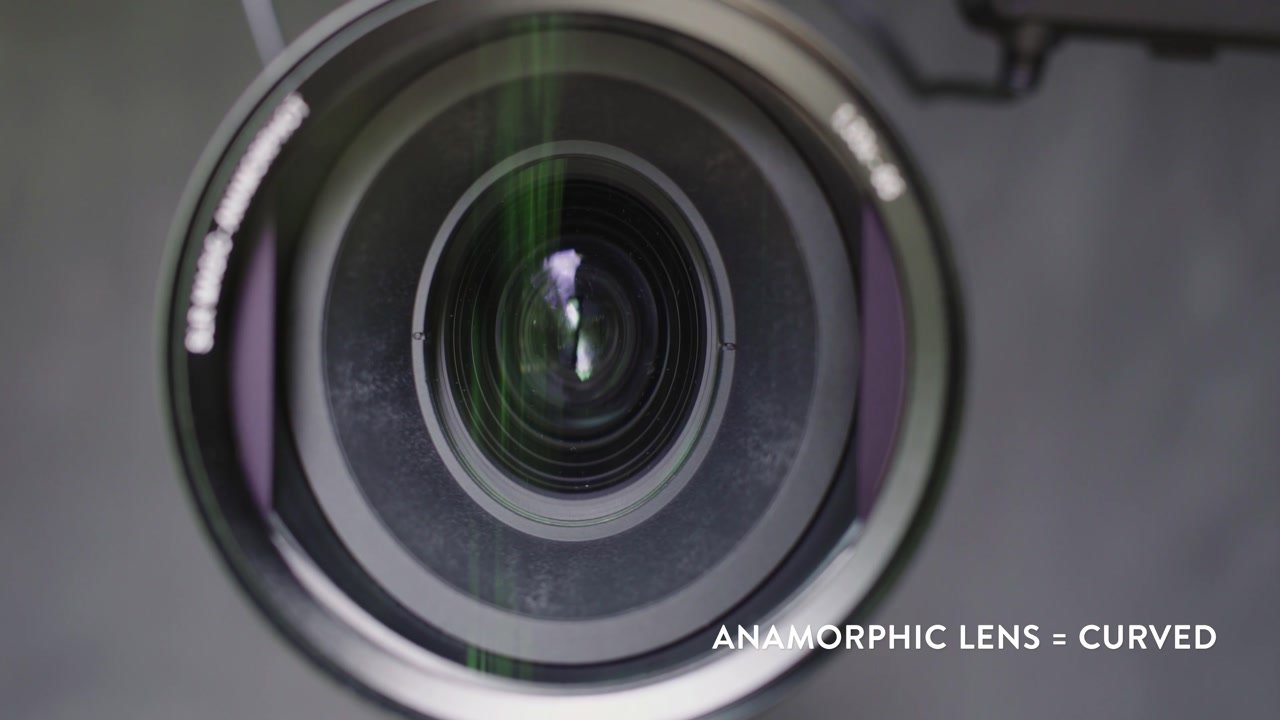
Anamorphic lenses are behind some of the most iconic shots in cinema. Their unique characteristics deliver footage with a specific look that movie-lovers and filmmakers fall for over and again. In this episode of our How To Video series, we’re taking a deep dive into anamorphic lenses, starting with their origins, and how the footage they produce differs from standard lenses. Keep reading to learn how to produce anamorphic footage without breaking the bank, and uncover inspiring ideas for using it in your business videos. All About AnamorphicIn this video, Nick LaClair, head of video production for SproutVideo, breaks down the history of anamorphic lenses, and explains how they’re differentiated. He’ll also show you exactly how you can film anamorphic footage on a budget. What is an Anamorphic Lens?Anamorphic lenses are distinguished from other types of lenses primarily by their unique shape. While normal lenses are called spherical lenses because they’re round, anamorphic lenses are curved, which gives the optics an oval shape.
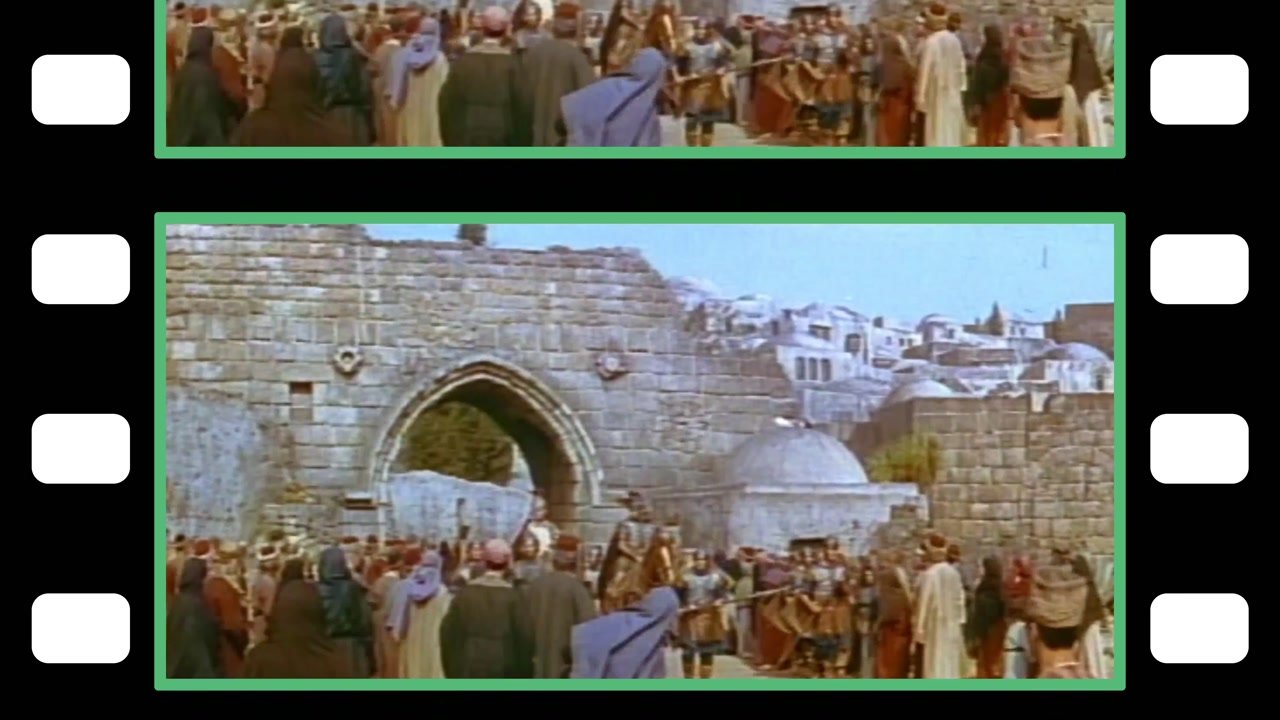
This key difference results in beautiful, unique footage. Once you learn how to spot it, you’ll notice it in lots of your favorite films and TV shows. Before we get to that, let’s start with how anamorphic lenses came about. Anamorphic Lenses and Aspect RatiosEarly films used what is known as the academy aspect ratio, which is roughly 4:3. When TV arrived on the scene in the 1950’s, it also used a 4:3 aspect ratio for programming. Film producers needed a way to motivate audiences to come into the cinema instead of staying at home to watch TV. As a result, widescreen formats were introduced to draw viewers back into theaters. However, film strips were not adapted to widescreen formats. The academy aspect ratio fit perfectly on 35mm film, taking up 4 perforations:
In contrast, a widescreen format on 35mm film takes up only 3 perforations. This would’ve resulted in a lower quality, blurry, and unappealing image.
Certain middle ground aspect ratios, like 1.85:1, popularized by Hitchcock, looked just fine with some cropping, but for widescreen formats, it simply didn’t work. The solution was to use anamorphic lenses to squish a 2.39:1 widescreen format onto the 35mm film strips. Then, the squished image would be stretched back out for viewing on a widescreen.
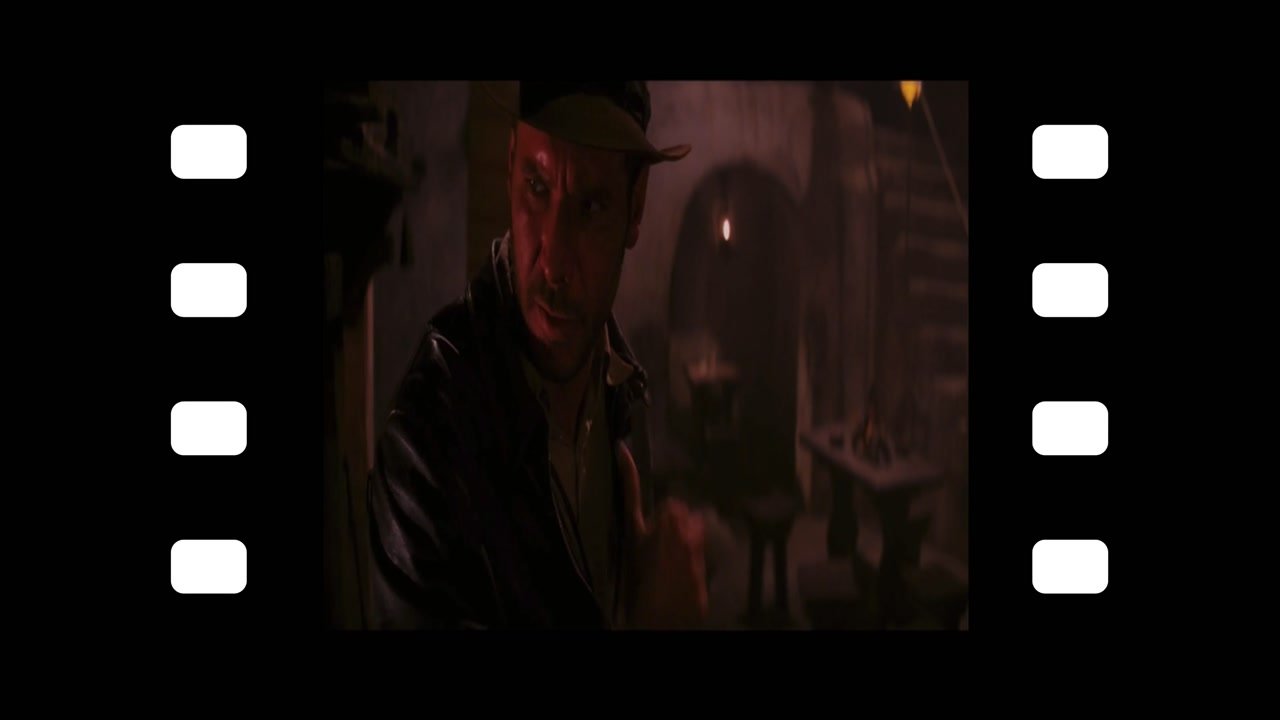
In fact, the most popular screen format today, 16:9, came about because it’s the perfect compromise between 2:39:1 and 4:3. Whether the footage is letterboxed or pillarboxed, the amount of screen covered by black bars is approximately the same when viewed on a 16:9 screen. Why It’s So SpecialAnamorphic lenses deliver footage that really stands out. Without even knowing it, you’ve surely encountered it many times. Here are the defining elements of anamorphic footage. Horizontal Lens FlaresWhen you’re filming with an anamorphic lens, your footage is squeezed, then stretched back out again. This results in some really dramatic and easily identifiable horizontal lens flares.
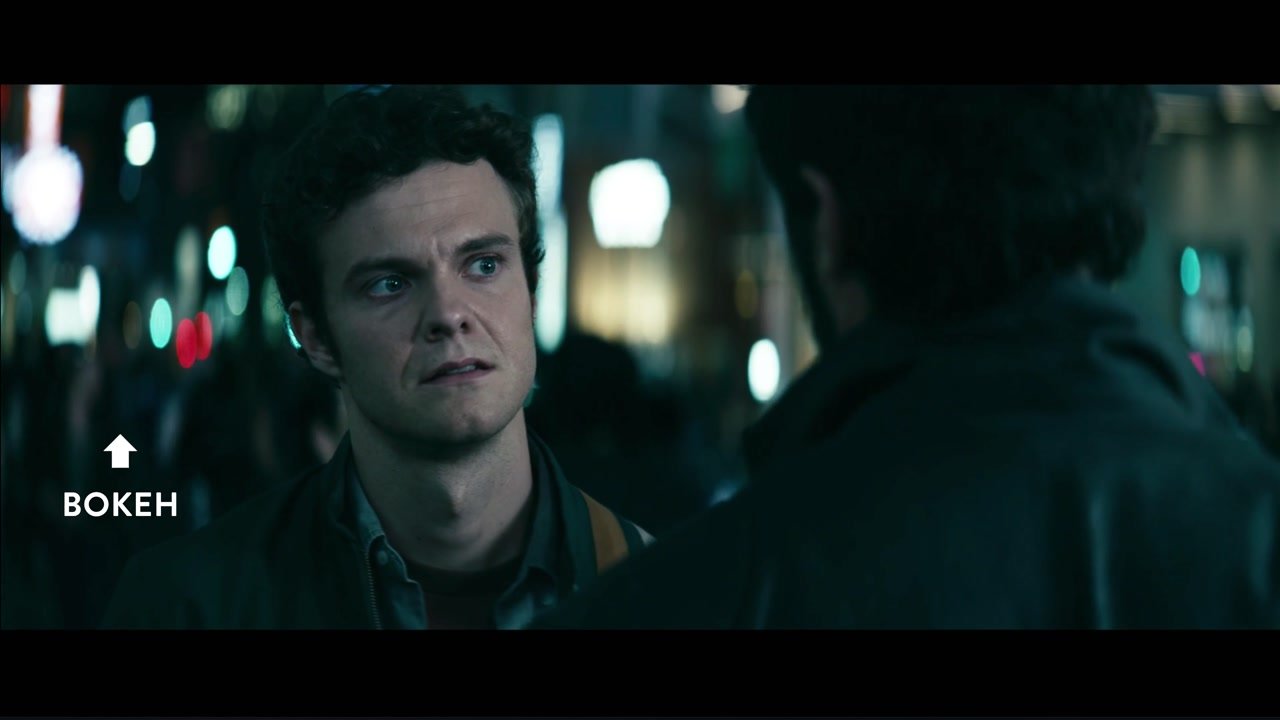
You can see this effect in the footage above, where the light streaks across the top of the frame. It’s very atmospheric, and heightens the emotional charge of the scene. The dramatic visual of the horizontal lens flare really delivers that cinematic impact for viewers. Bokeh in the BackgroundDespite it’s funny-sounding name, bokeh is actually an extremely important part of shot composition. It refers to the out-of-focus background areas in view. When captured with a standard lens, background lights and other out-of-focus elements will appear rounded. In contrast, with an anamorphic lens, they’ll appear oval-shaped.
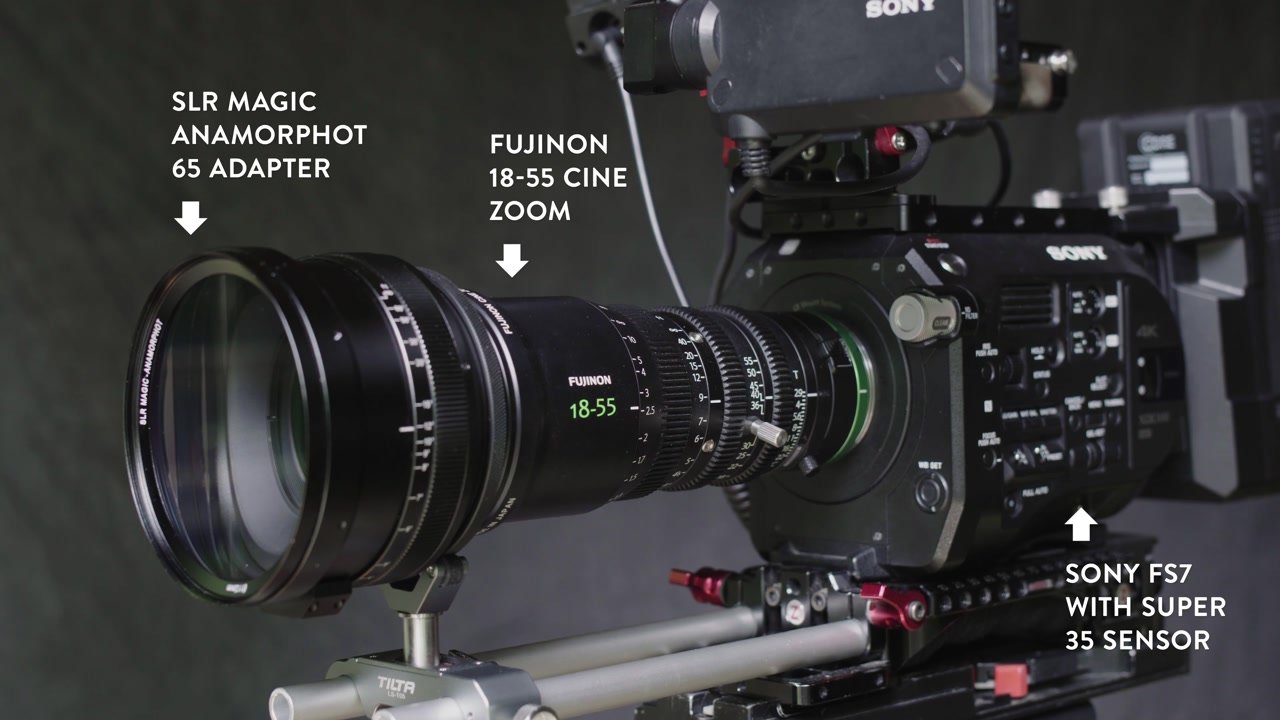
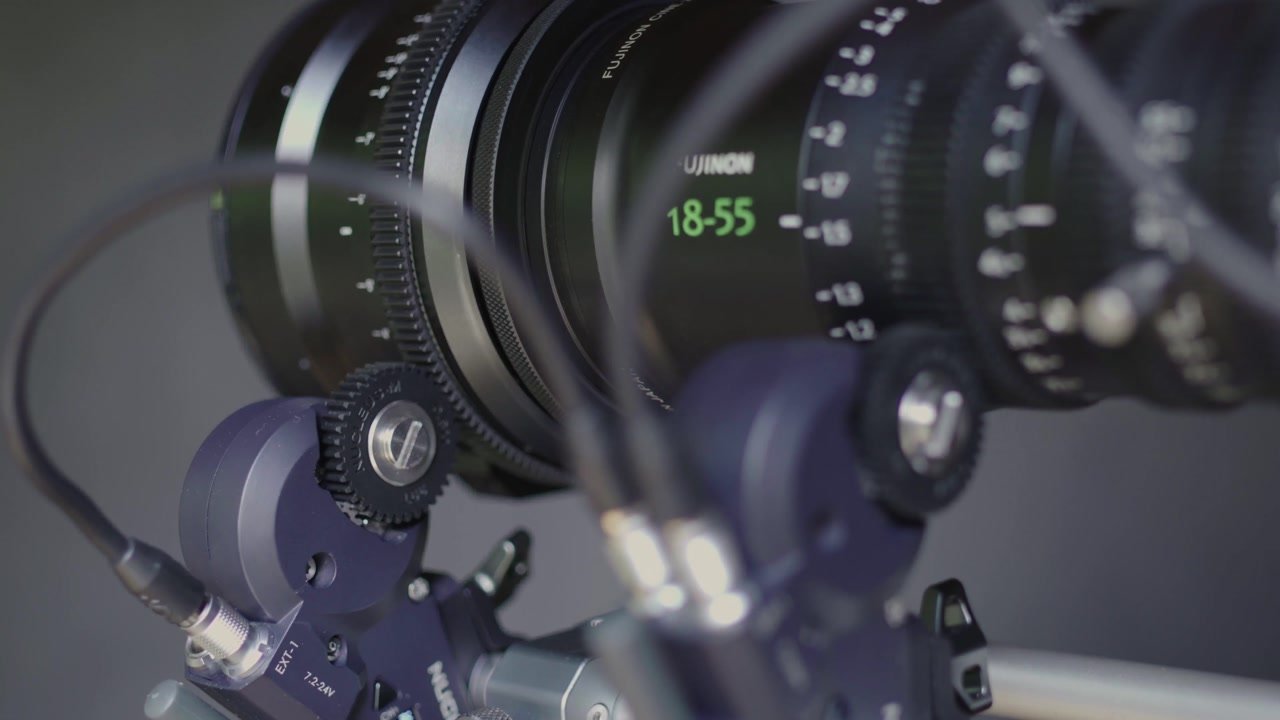
This is probably the easiest way to identify anamorphic footage because it’s so iconic and readily distinguishable. It also adds an artistic, three-dimensional element to your footage that you can’t really achieve any other way. Intentionally ImperfectGiven that the footage is squeezed, then stretched, it’s no wonder that anamorphic lenses aren’t the sharpest option out there. In fact, they’re known – and loved – for their imperfections. For instance, while the visuals aren’t as sharp when compared to standard lenses, the distortion is both desirable and subtle. It adds character, and softens the image in a visually appealing way. The quirks of anamorphic footage impose some constraints on filmmakers to a certain extent. For instance, the distortion essentially forces you to keep your subject near the center of the shot. In some cases, that can be a challenge, but it’s easily overcome with some creativity. Shoot Wide Angle Without a Wide LensWith an anamorphic lens, you can shoot wide angle without using a wide lens (head to our previous episode for a primer on lens types if you’re unsure what that means). Here’s why: if you’re shooting with a 60mm anamorphic lens, it’s stretched out to a 30mm field of view. Since longer lenses compress the background and tend to have more bokeh, anamorphic lets you shoot wide, but with all the characteristics of that longer lens. How To Use It For Business VideoGot a new feature release or product announcement? What better way to go about it than with tons of cinematic flair and anamorphic footage. For instance, Taco Bell knocked it out of the park with this ad campaign for their new seasoned fries in 2018. You can easily identify the footage as anamorphic because of the oval-shaped bokeh (at 0:06), widescreen letterboxing, and even a horizontal lens flare (at 1:14). It reads as epically cinematic, and an overall genius idea for generating excitement for their new fries. How to Shoot AnamorphicFirst up, you’ll need the right gear for your shoot. You can acquire a true anamorphic lens kit, or, an adapter suited to the type of camera you already have. For a detailed comparison of these options, we love this thorough video on anamorphic lenses and adapters from ShareGrid. True Anamorphic LensesA true anamorphic lens can be extremely pricey – they can cost you as much as a new car. The most economical options we’ve seen are from Atlas and SLR Magic, which run around $8,000 – $9,000 for a three-lens kit. A big benefit to using an anamorphic lens is that you won’t need as many extras in your setup. For instance, pulling focus is a lot simpler with a purpose-built anamorphic lens. Still, the higher price tag motivates many to go with more budget-friendly adapters instead. AdaptersAdapters have proliferated for all different types of video cameras, including drones and phones. They range dramatically in cost and quality. If you’re filming with a camera that supports interchangeable lenses, one big advantage worth noting is that one adapter will likely work across most of your lenses. This gives you a lot of flexibility and helps maximize your investment. For professional camcorders, like Nick’s Sony FS7, adapters come in two different types: rear-mounted and front-mounted. In our experience, the rear-mounted adapters don’t quite deliver the anamorphic look, making front-mounted adapters the way to go. Here’s our anamorphic adapter setup:
Camera ChoiceWhether you go with an adapter or a real anamorphic lens, ideally, you want to select a camera that can film in a 4:3 aspect ratio. Otherwise, the image won’t be squeezed enough to get the full anamorphic effects you’re aiming for. For instance, the Panasonic GH5 or Blackmagic Pocket Cinema cameras can shoot in 4:3, which allows you to use a 2x anamorphic adaptor to squeeze the image in half. This essentially replicates the original process from the film days. Of course, big cinema rigs like Red or Arri are excellent options as well if your budget allows for it. If – like the rest of us – you’re shooting on a super 35 sensor, there are 1.33x anamorphic adaptors that will squeeze your image about 30%. That’s just the right amount to stretch it back from 16:9 to 2.39:1. It’s still a great look, and all those classic anamorphic qualities will be there in your footage. They’ll just be a little more subtle. ExtrasOne significant consideration for anamorphic adaptors is that they have a totally separate focus ring. To pull focus, you need to turn focus on the lens and the adaptor simultaneously. They need to be perfectly in sync for it to work properly. In our setup, Nick uses a remote follow focus with two motors synced together. This adds a little extra complexity to your setup.
Additionally, you’ll need a separate monitor that can stretch the image for preview. Most consumer cameras don’t have the ability to do that. Evaluating your footage based on the squeezed image would be too difficult and prone to error, so we found this to be a necessary add-on. Drawbacks of Anamorphic LensesNo lens is perfect for all situations, and there are some considerations worth taking into account before you go all-in on anamorphic lenses. For starters, there are the general drawbacks of the widescreen format. You’re giving up valuable real estate on 16:9 screens. On mobile and small screens, that could make a big difference. Of course, you can crop anamorphic footage to a 16:9 format. You just have to plan for that when filming, or you risk cropping important elements out of the frame. Additionally, you might find the quirks of working with anamorphic lenses are not right for your project. Not everything has to be cinematic, after all. You might find a sharper lens with less distortion is a better fit depending on what you’re filming. Finally, an anamorphic setup is not going to be in everyone’s budget, even if you go with adapters. We wound up with roughly $3,500 in extras to achieve the look we wanted using our Sony FS7 with a front-mounted adapter. All those extras also made filming much more complex, and increased our setup time dramatically. Amazing AnamorphicDespite those potential downsides, anamorphic footage is worth the effort for many shoots. It’s all about finding ways to make the most of its specific look. After all, anamorphic footage is captivating, and can really help you stand out from the crowd. It’s the perfect choice for when you want to make an impact on your audience. Have you worked with anamorphic footage before? Curious to give it a try? We’d love to hear about your experience. Share your comments and questions below for expert advice. Be sure to subscribe to our newsletter to get the next episode our How To Video series in your inbox. from SproutVideo https://sproutvideo.com/blog/amazing-anamorphic-lens.html via IFTTT from https://johnsmith0190.tumblr.com/post/188271765963 from https://alvindukes.blogspot.com/2019/10/amazing-anamorphic-add-cinematic-flair.html If you are looking online for a funny or cute video, dogs are one of the most popular stars of these types of videos! Pets and dogs offer some of the funniest moments you will ever see! They are so innocent and cute, and you can’t help but realize that most of the things they […] The post Dog Perfectly Mocks Teenager’s Broken Leg ‘Walk’ appeared first on Viral Viral Videos. via Viral Viral Videos https://viralviralvideos.com/2019/10/10/dog-perfectly-mocks-teenagers-broken-leg-walk/ Check out these two buddies sharing some down time together. Cuteness overload! More The post Baby and cat preciously cuddle with each other appeared first on Viral Viral Videos. via Viral Viral Videos https://viralviralvideos.com/2019/10/09/baby-and-cat-preciously-cuddle-with-each-other/ Calling the Tesla to come pick up passengers during a torrential downpour. More The post Self Driving Car Called for Rainy Rescue appeared first on Viral Viral Videos. via Viral Viral Videos https://viralviralvideos.com/2019/10/07/self-driving-car-called-for-rainy-rescue/ |

Alvin DukesYour channel page is another often great opportunity to alert the algorithm about your content. Make sure that you fill out every aspect of your page. Archives
April 2023
Categories |


 RSS Feed
